Be warned: McFails Cave is NOT an accesible cave. The cave is owned and managed by the National Spelelogical Society. Directions, permission, and access can only be managed through them. Do not interpret any part of this article as an instruction manual on caving, vertical caving, or even photography.
I was lying shirtless in short shorts, hugging the bare rock to try to cool off. I’d been told New York caving was supposed to be cold, but apparently, the Halls Hole Entrance to McFails Cave is the exception—especially during a near-record heatwave. Heavy rains over the previous days had swollen the surface stream, sending a torrent of 70+ degree water through the entrance and raising the temperature of the air and rock from a refrigerator-like 43°F to a borderline tropical 70°F.
Just three hours north of New York City and about an hour west of Albany lies the caves and karst of Schoharie County. Here, massive slabs of Coeymans and Manlius Limestones rest about a thousand feet above sea level. Rainwater collects on the harder rock layers above and infiltrates the limestone. Where that infiltration coincides with a vertical weakness, water plunges straight down—until it hits the bottom of the limestone or a resistant layer within it, whichever comes first.
This dramatic display of karst hydrology is the centerpiece of the McFails Cave Nature Preserve, owned and managed by the National Speleological Society. With over 10 miles of surveyed passage, McFails is the longest cave in New York, and by some definitions, the longest in the northeastern United States. Its two entrances are both vertical shafts, each about 70 feet deep. Typically, the water and rock inside are cold even by caving standards—hovering in the low 40s.
Except for today.
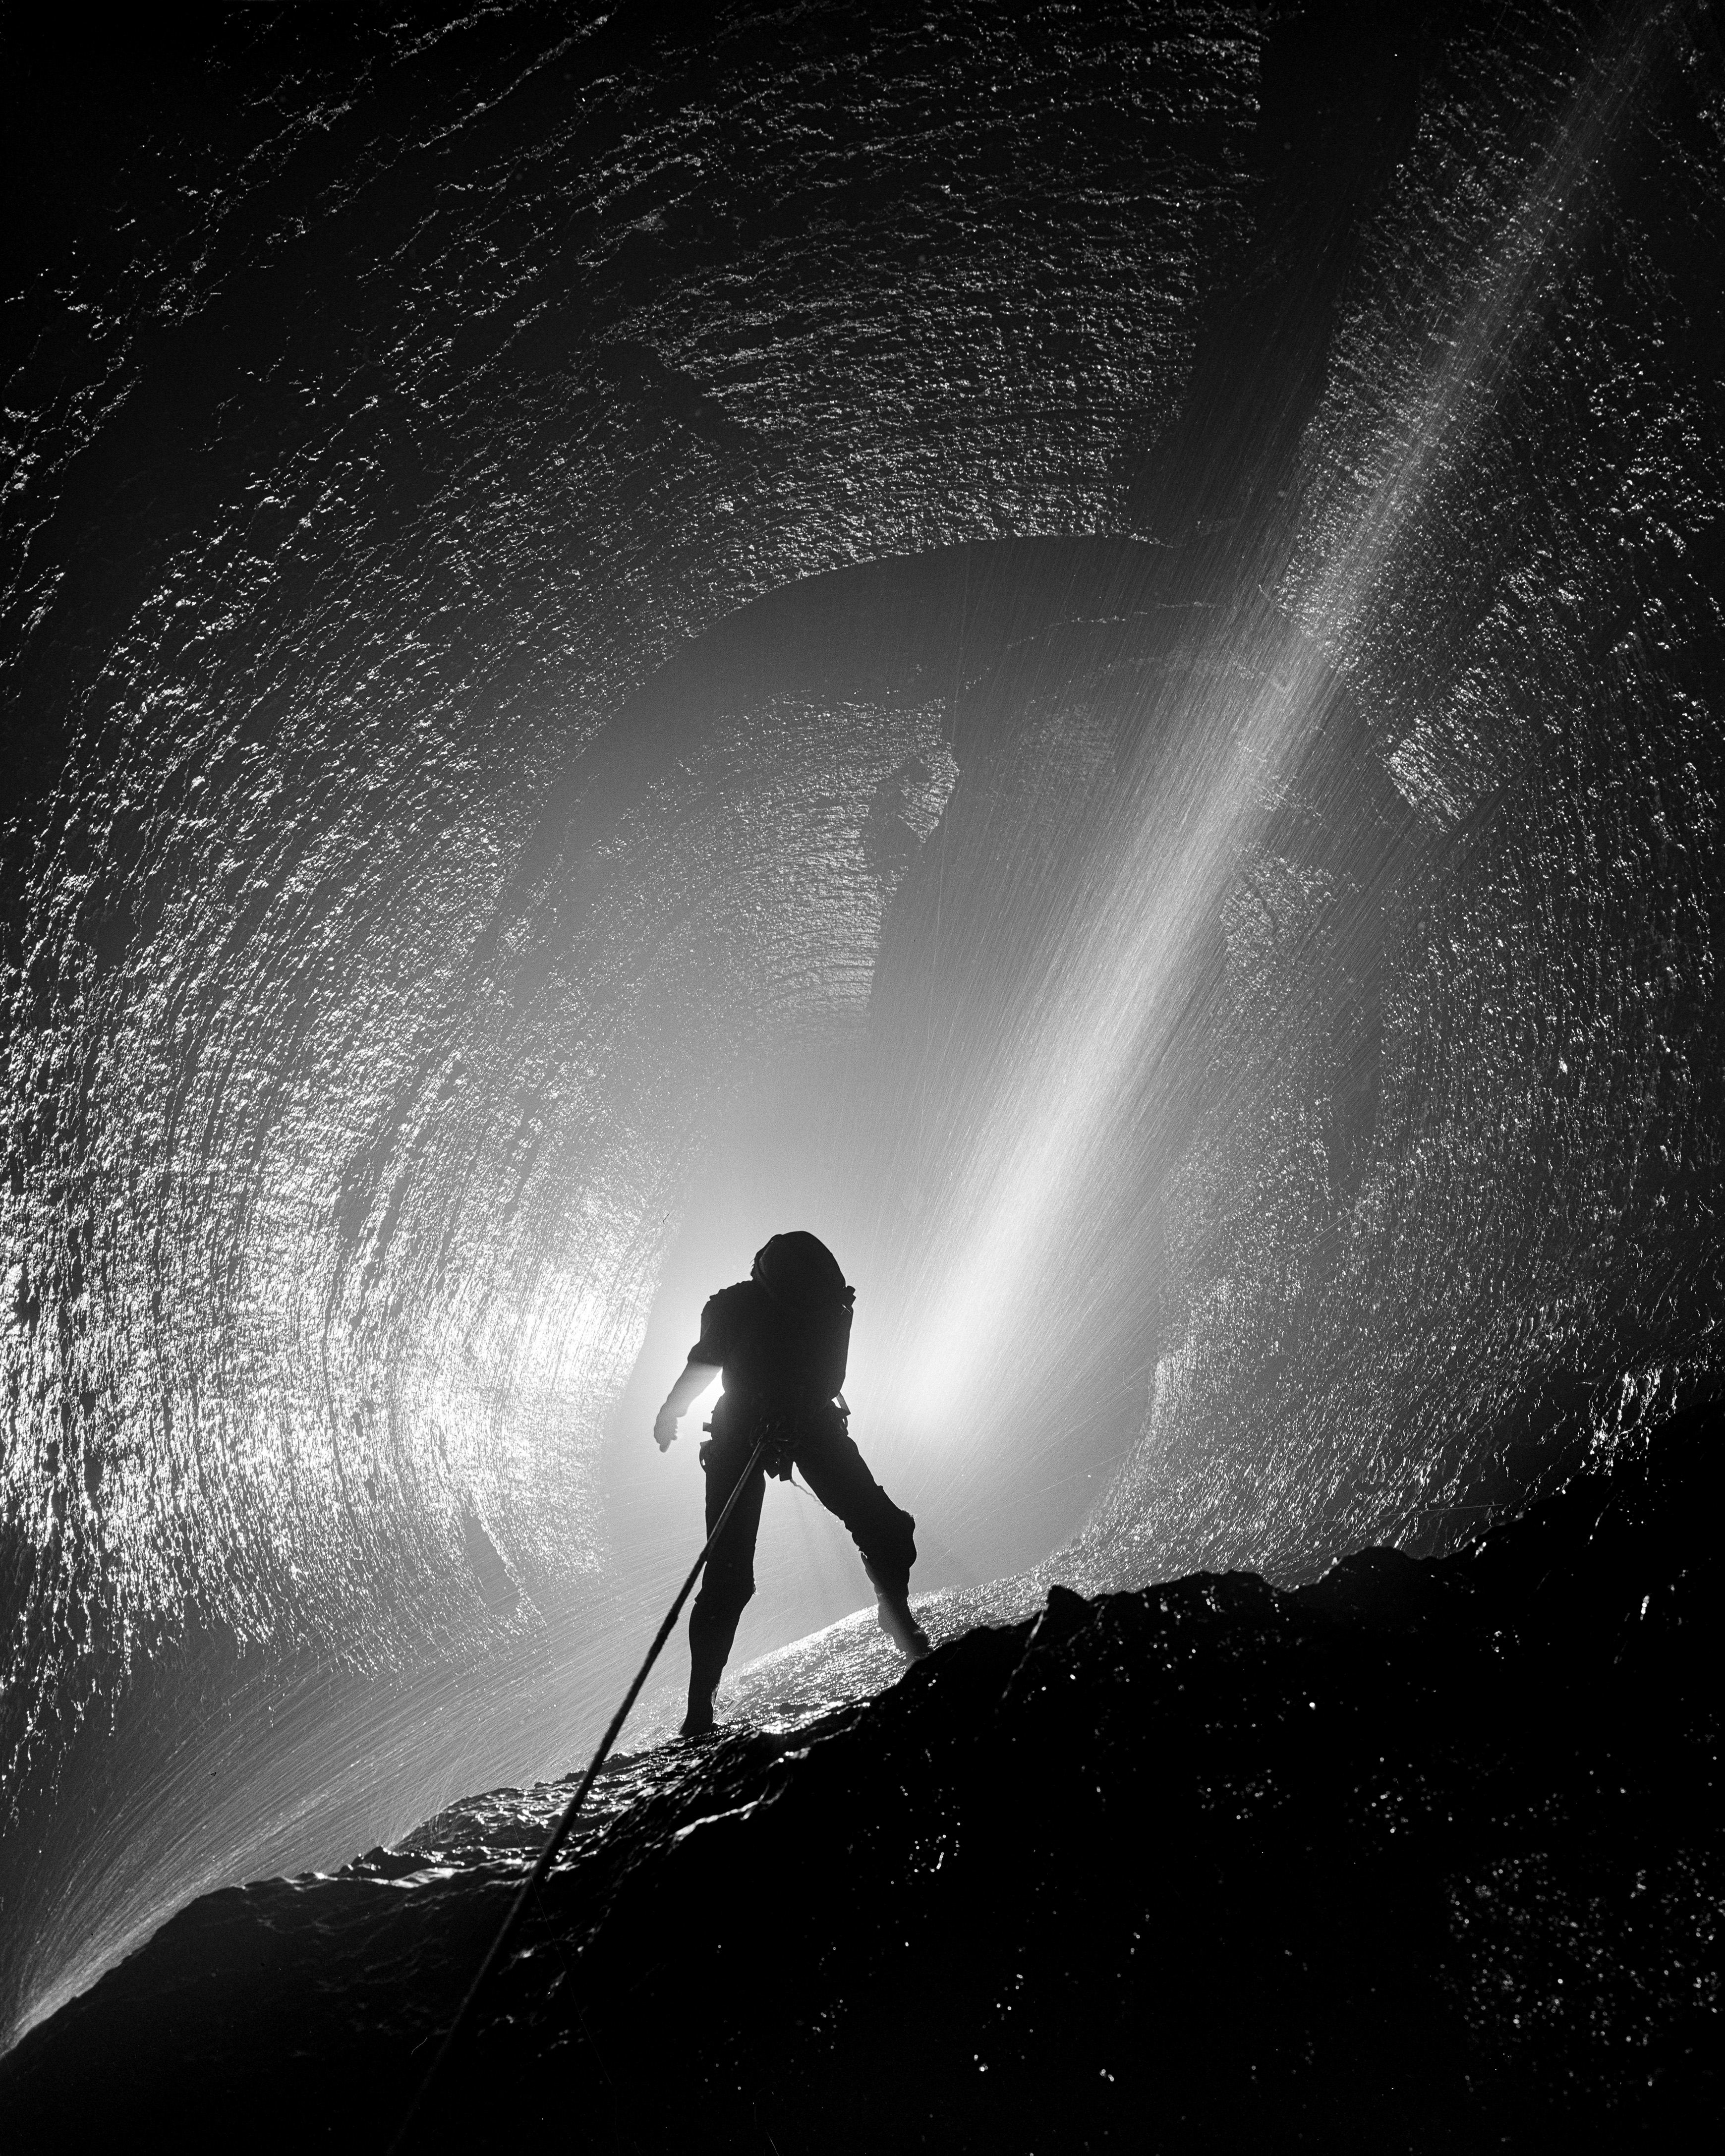
On this hot, humid day with a heat index approaching 100°F, I traced the snaking surface stream toward the Halls Hole Entrance. The entrance itself is unassuming; the stream simply disappears into a small hole just big enough to scoot down into. Only a faint hissing at the dripline hints at the spectacular pit inside: Coeymans Dome.
The hands-and-knees crawl at the entrance quickly drops about 7 feet to a large ledge overlooking the rest of the 70-foot pit. Under normal conditions, this ledge is dry—the stream actually sinks just upstream of the entrance, and from the top of the pit, you can watch it reappear through a hole in the ceiling and plummet down the shaft. But in high water, like today, the stream charges straight through the entrance, transforming the drop into a violent whitewater maelstrom.
In either condition—dry or raging—Coeymans Dome is a beautiful pit.
The Thing From Coeymans Dome
The Story Behind The Photo
Published on Tuesday, 15 July 2025. Revision 0.
Contents
The Thing From Coeymans Dome
The Story Behind The Photo
Published on Tuesday, 15 July 2025. Revision 0.
Take One
Coeymans Dome has been photographed many times, by many people. But during the 2025 NSS Convention in Cobleskill, I wanted something for myself. Something that wasn’t “work.” Photographing this pit in large-format black and white seemed perfect. It was close—only 10 minutes from camp—and easy enough caving to barely count as caving.
I broke a few rules on this first attempt. The preserve requires wetsuits. I was shirtless and in shorts, trying (and failing) to stay cool. I don’t do humid heat.
Nathan Roser, Cat Brown, and Hope Brooks joined me. We ran into Erik Neiman, the preserve manager, and his group exiting the cave. I took a look down the pit to make a game plan. Coeymans Dome was exactly as advertised: nearly circular, carved from black limestone, with a plunging plume of water dropping the full depth of the shaft. When Cat reached the bottom and looked back up, the backlit view was almost indescribably stunning.
I took a digital test exposure with my Canon 5D Mark IV using the flashbulbs I had brought along. I know how to mentally convert the histogram readouts on the camera's LCD to what the film negative should look like.
Beautiful!
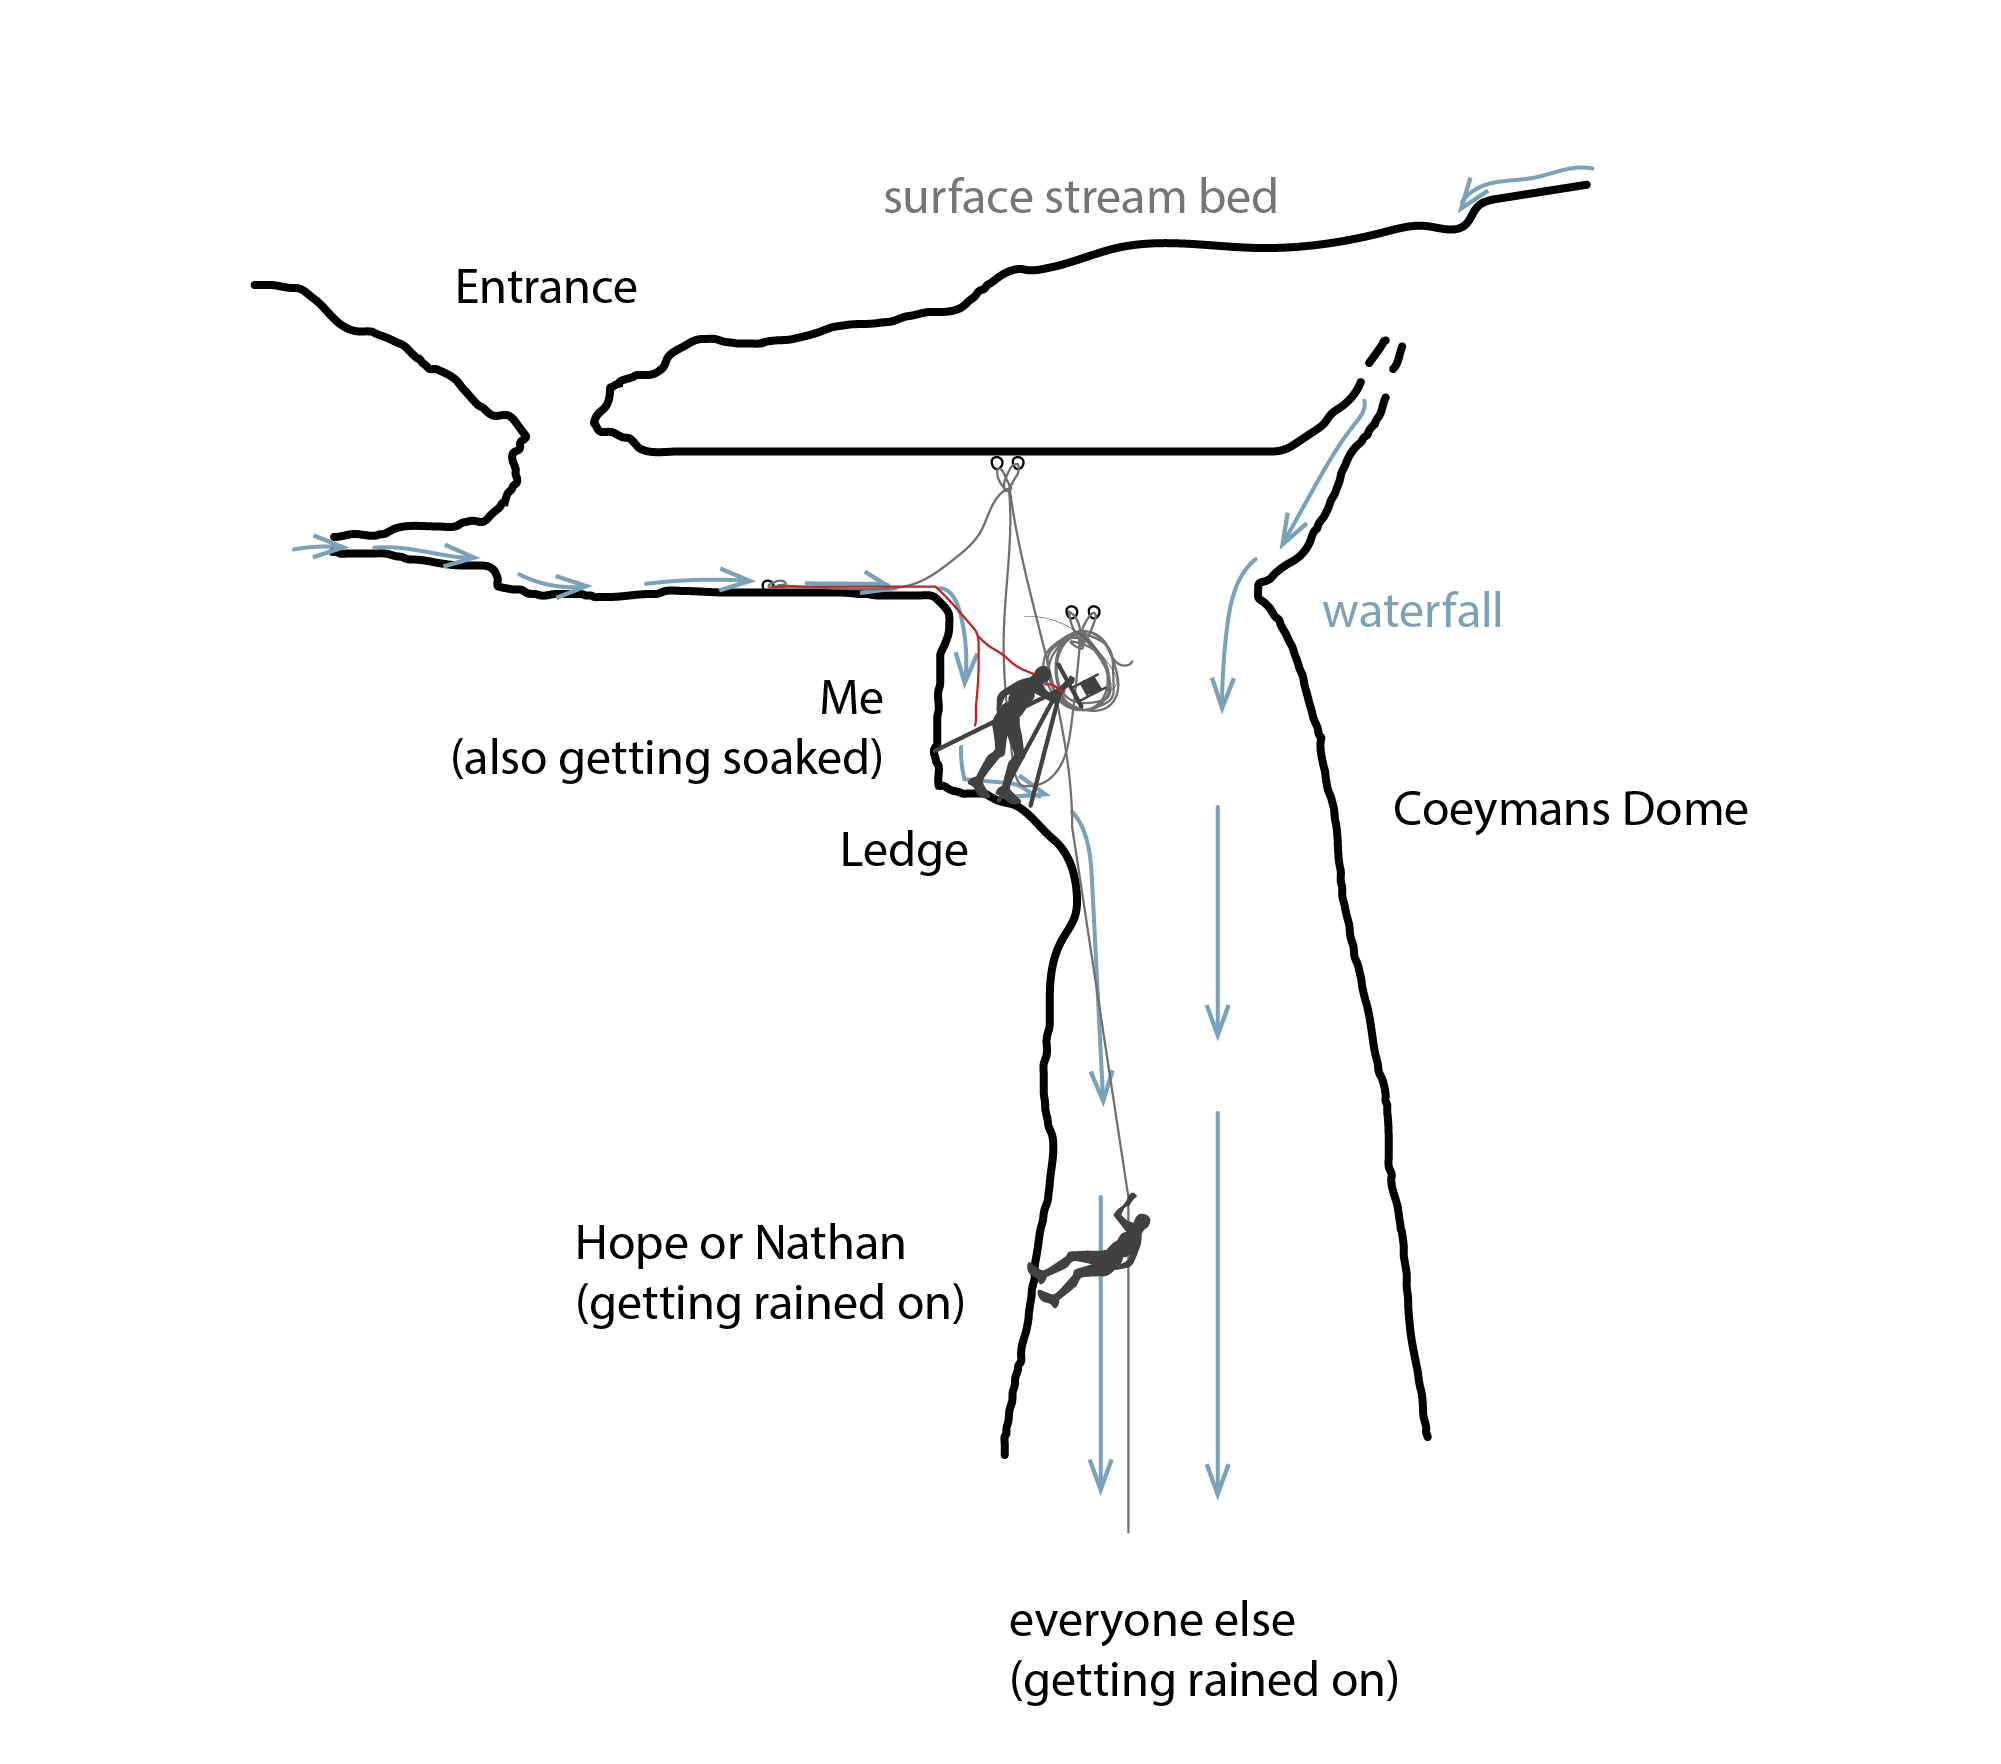
I began figuring out how to rig the monorail camera out over the pit. The ledge had enough space, but the camera’s weight kept threatening to pull the tripod into the shaft. I’d tied everything into nearby rebelay bolts, but I needed to tie the tripod back toward some upper anchors to keep it upright. Unfortunately, this placed the upper strap in the small stream still flowing over the ledge—water wicked right down and onto me. Hope, perched in the entrance, stuck her foot under the strap to keep it out of the water.
With much finagling, I tensioned and locked the tripod in place.
Unfortunately, the rig relied on human endurance. As I kept adjusting focus and exposure, Hope’s foot started going numb. Just as I removed the dark slide to take the shot, her foot slipped. The counterbalance went slack, and the tripod, camera, and my bag swung wildly over the pit. I tried to wrestle it back under control, but eventually had to admit this shot wasn’t happening.
Take Two
Two days later, I returned with better gear. Nathan was off on a deeper trip, and Cat was volunteering, so I rounded up Conal Richards, JD Lewis, and Alexa Simmons. Conal had just attended the cave photography workshop that Hope and I ran the day before. I loaned him my brand-new PVC suit, since he didn’t have a wetsuit.
This time I brought a micro-traction, more rope, and a prusik loop. Drew Northup lent me his tripod, which had legs that locked angularly—key to preventing slippage. I let the rope hang straight down the entrance waterfall and secured the tripod using the prusik. The water wicked away cleanly this time, and I was able to jam the tripod into place using the camera’s weight.
It's difficult to fully explain the feeling of being in a situation like this. There are ropes going everywhere: I am tied into one, Hope is on another one. The camera and tripod are all tied into a third one. My pack is clipped onto a set of rebelay bolts next to me. Each time I need to use different gear I have to reach into the pack with a tether, clip it in, and then remove it to use it. If I work with things not clipped into tethers, and I drop them, the impact could very well kill whoever it hits. Everything has to be setup in a very specific and calculated process to keep from getting hopelessly tangled in a web of ropes. All the while there's the sensory aspect: the visuals of constantly looking down the pit, the general lack of a floor below, the pounding roar of the waterfall. It's quite a lot to process at one time. Being this close to the entrance mean that every so often a bug would fly around me to check out my headlamp - just to add to the experience. It's totally insane to look around at the whole setup and realize that you're in control of the whole thing. The only anxiety in my head is dropping the film holders (the only thing I can't tether) down the pit.
It's a moment of pure and genuine adventure in the pursuit of artistic expression, and it's beautiful.
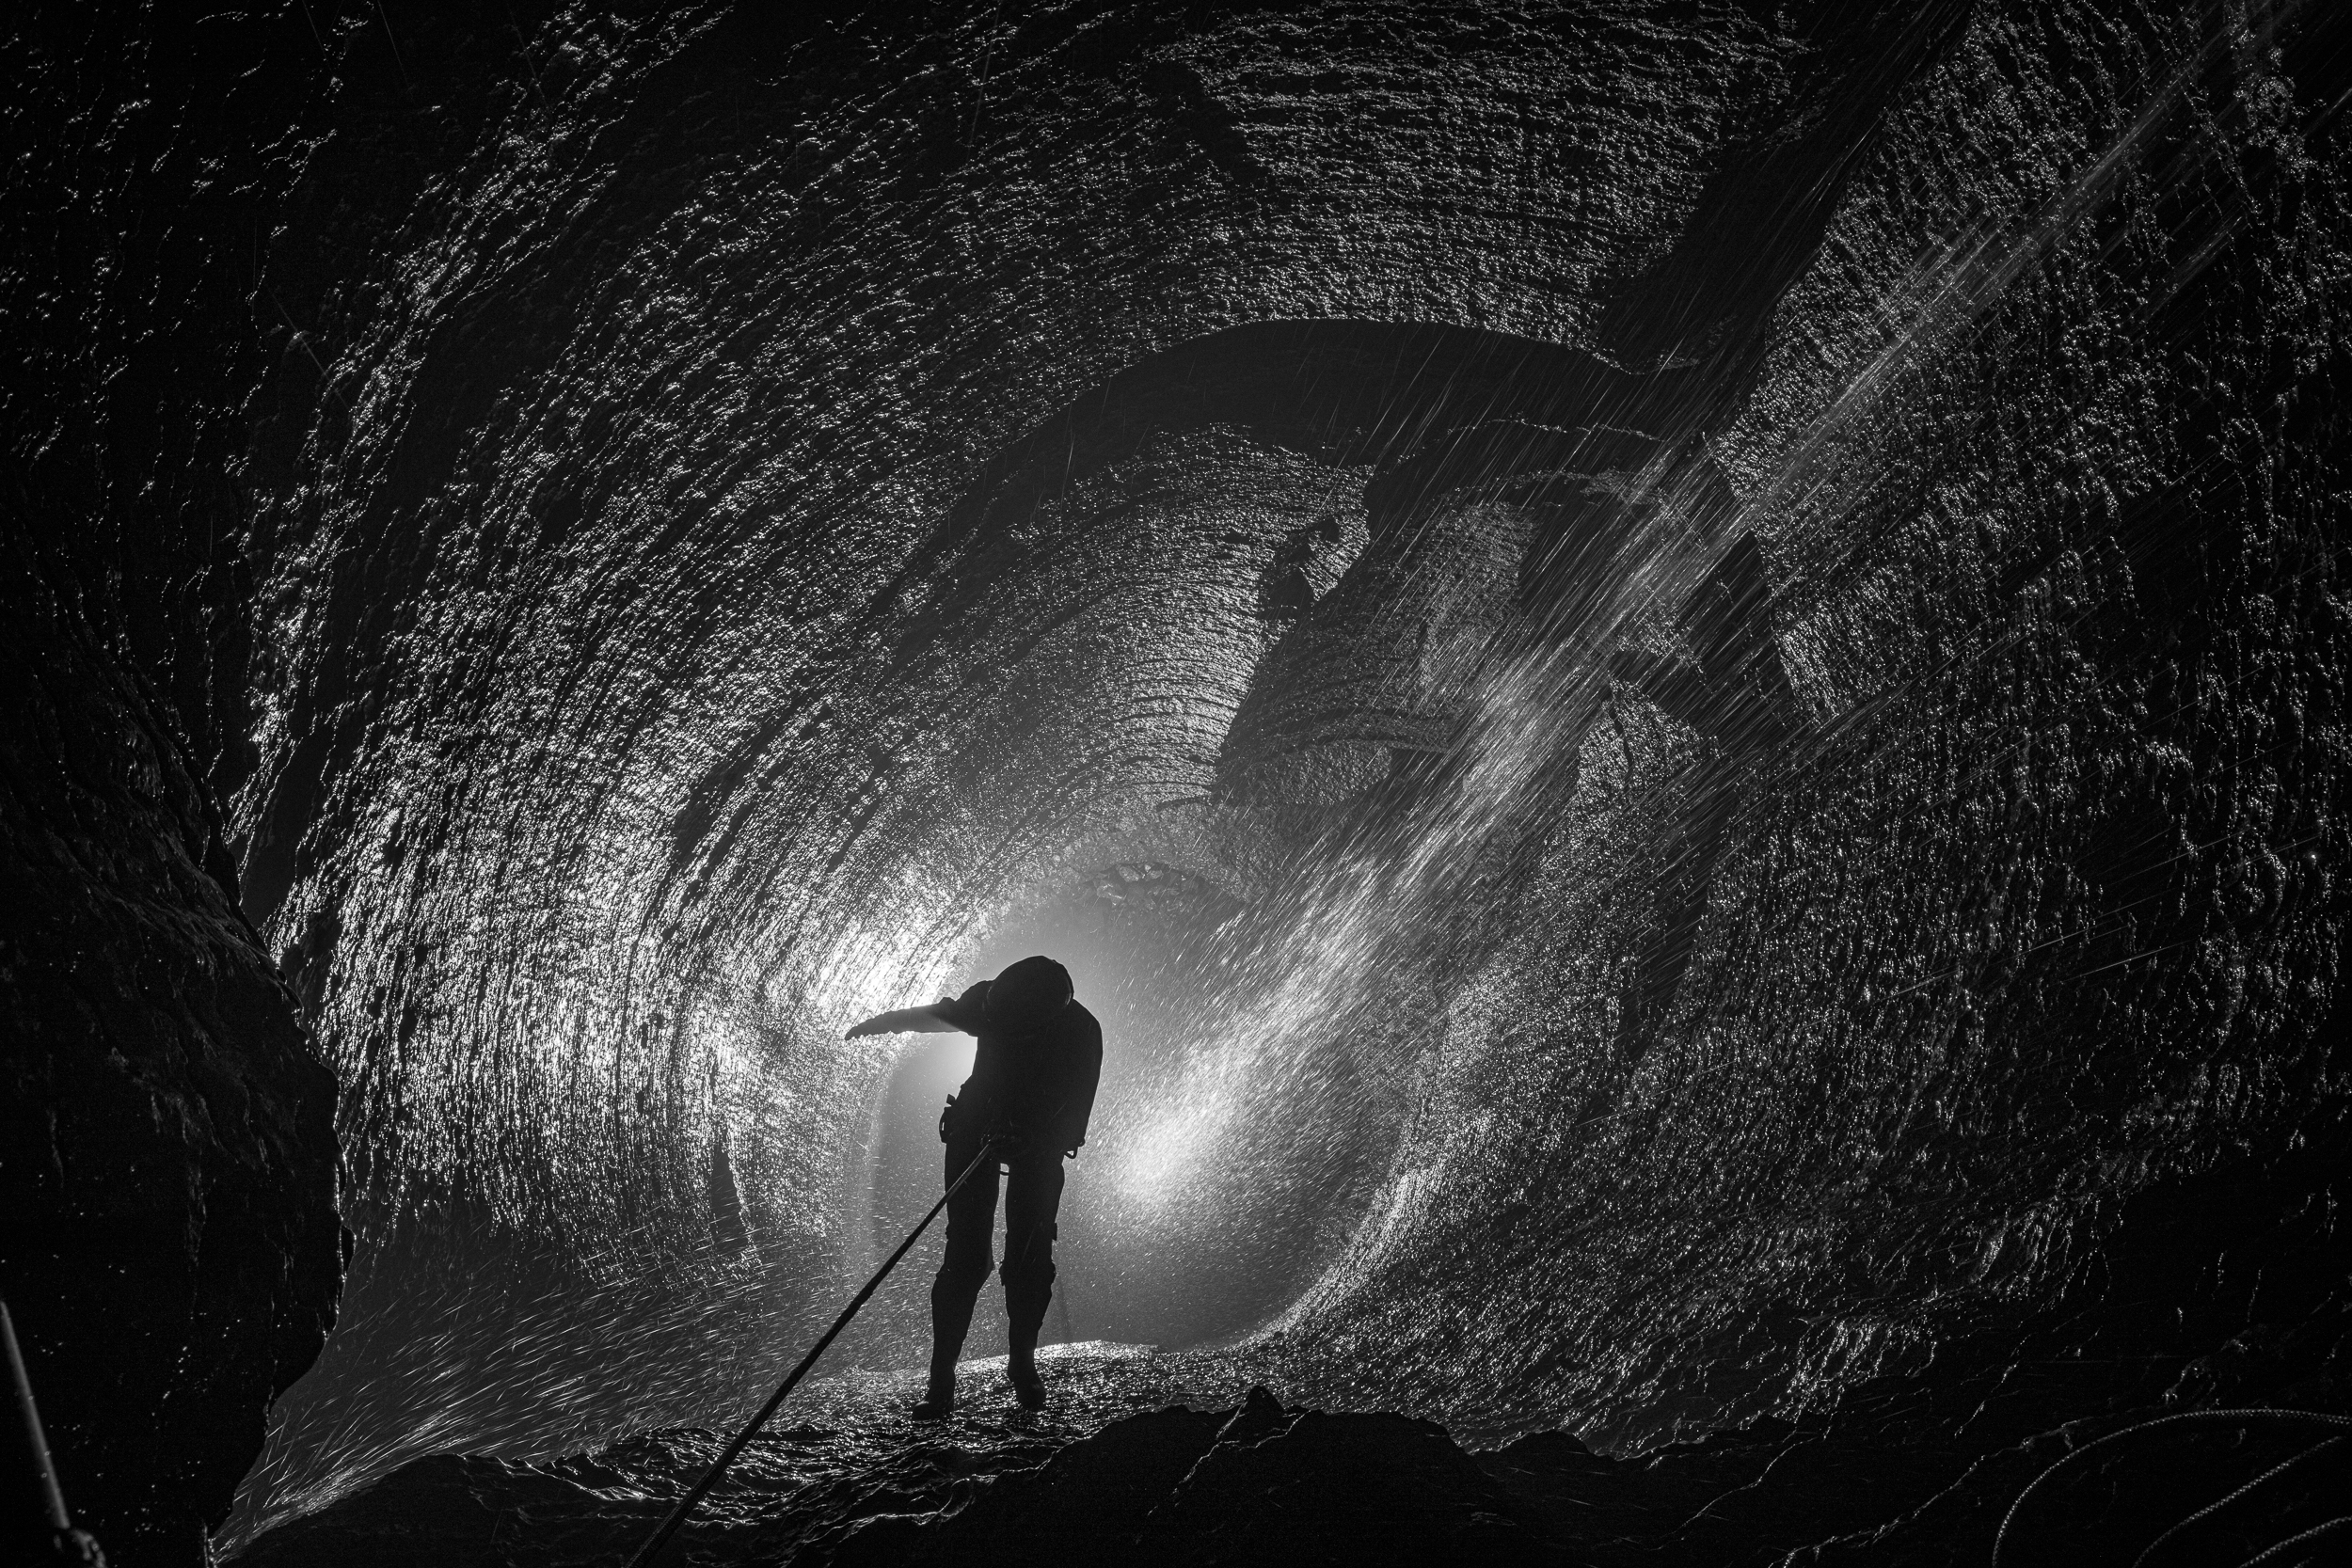
We were supposed to meet Nathan at the entrance around 6 p.m., but it was pushing 8 and no sign of him. Just then, another group showed up above me, also wondering where he was. I was already straddled over the pit, fully set up. We decided to shoot the photo before worrying about the delay.
As it turned out, Nathan’s group emerged at the bottom of the pit just then. With people ready to ascend, I had to move quickly—I was fully blocking their exit.
Hope, seated in her Franklin’s Seat, got into position. Conal prepared several large #22 flashbulbs. The first, used for a digital exposure test, fired perfectly. The next four didn’t fire, and one broke in the socket. Even Nathan couldn’t get them to work.
Then I remembered Conal had brought a flashlight he’d used in the workshop that produced around 16,000 lumens of light. It was so bright that I could see to focus with on the ground glass. A quick digital test exposure metered at f/16 for 1 second.
So I created four exposures. Each time I would have to reset the aperture to wide open and lean out over the pit to check the focus. Then I'd reset the aperture, engage the shutter, and load the fil. I'd have to wait a few seconds for everything to stop vibrating and shaking and I'd fire the shutter while pressing my ear to try to hear the click-hiss-click of the mechanics over the roar of the waterfall. Four expourses: hopefully one of them has the right combination of light and stability.
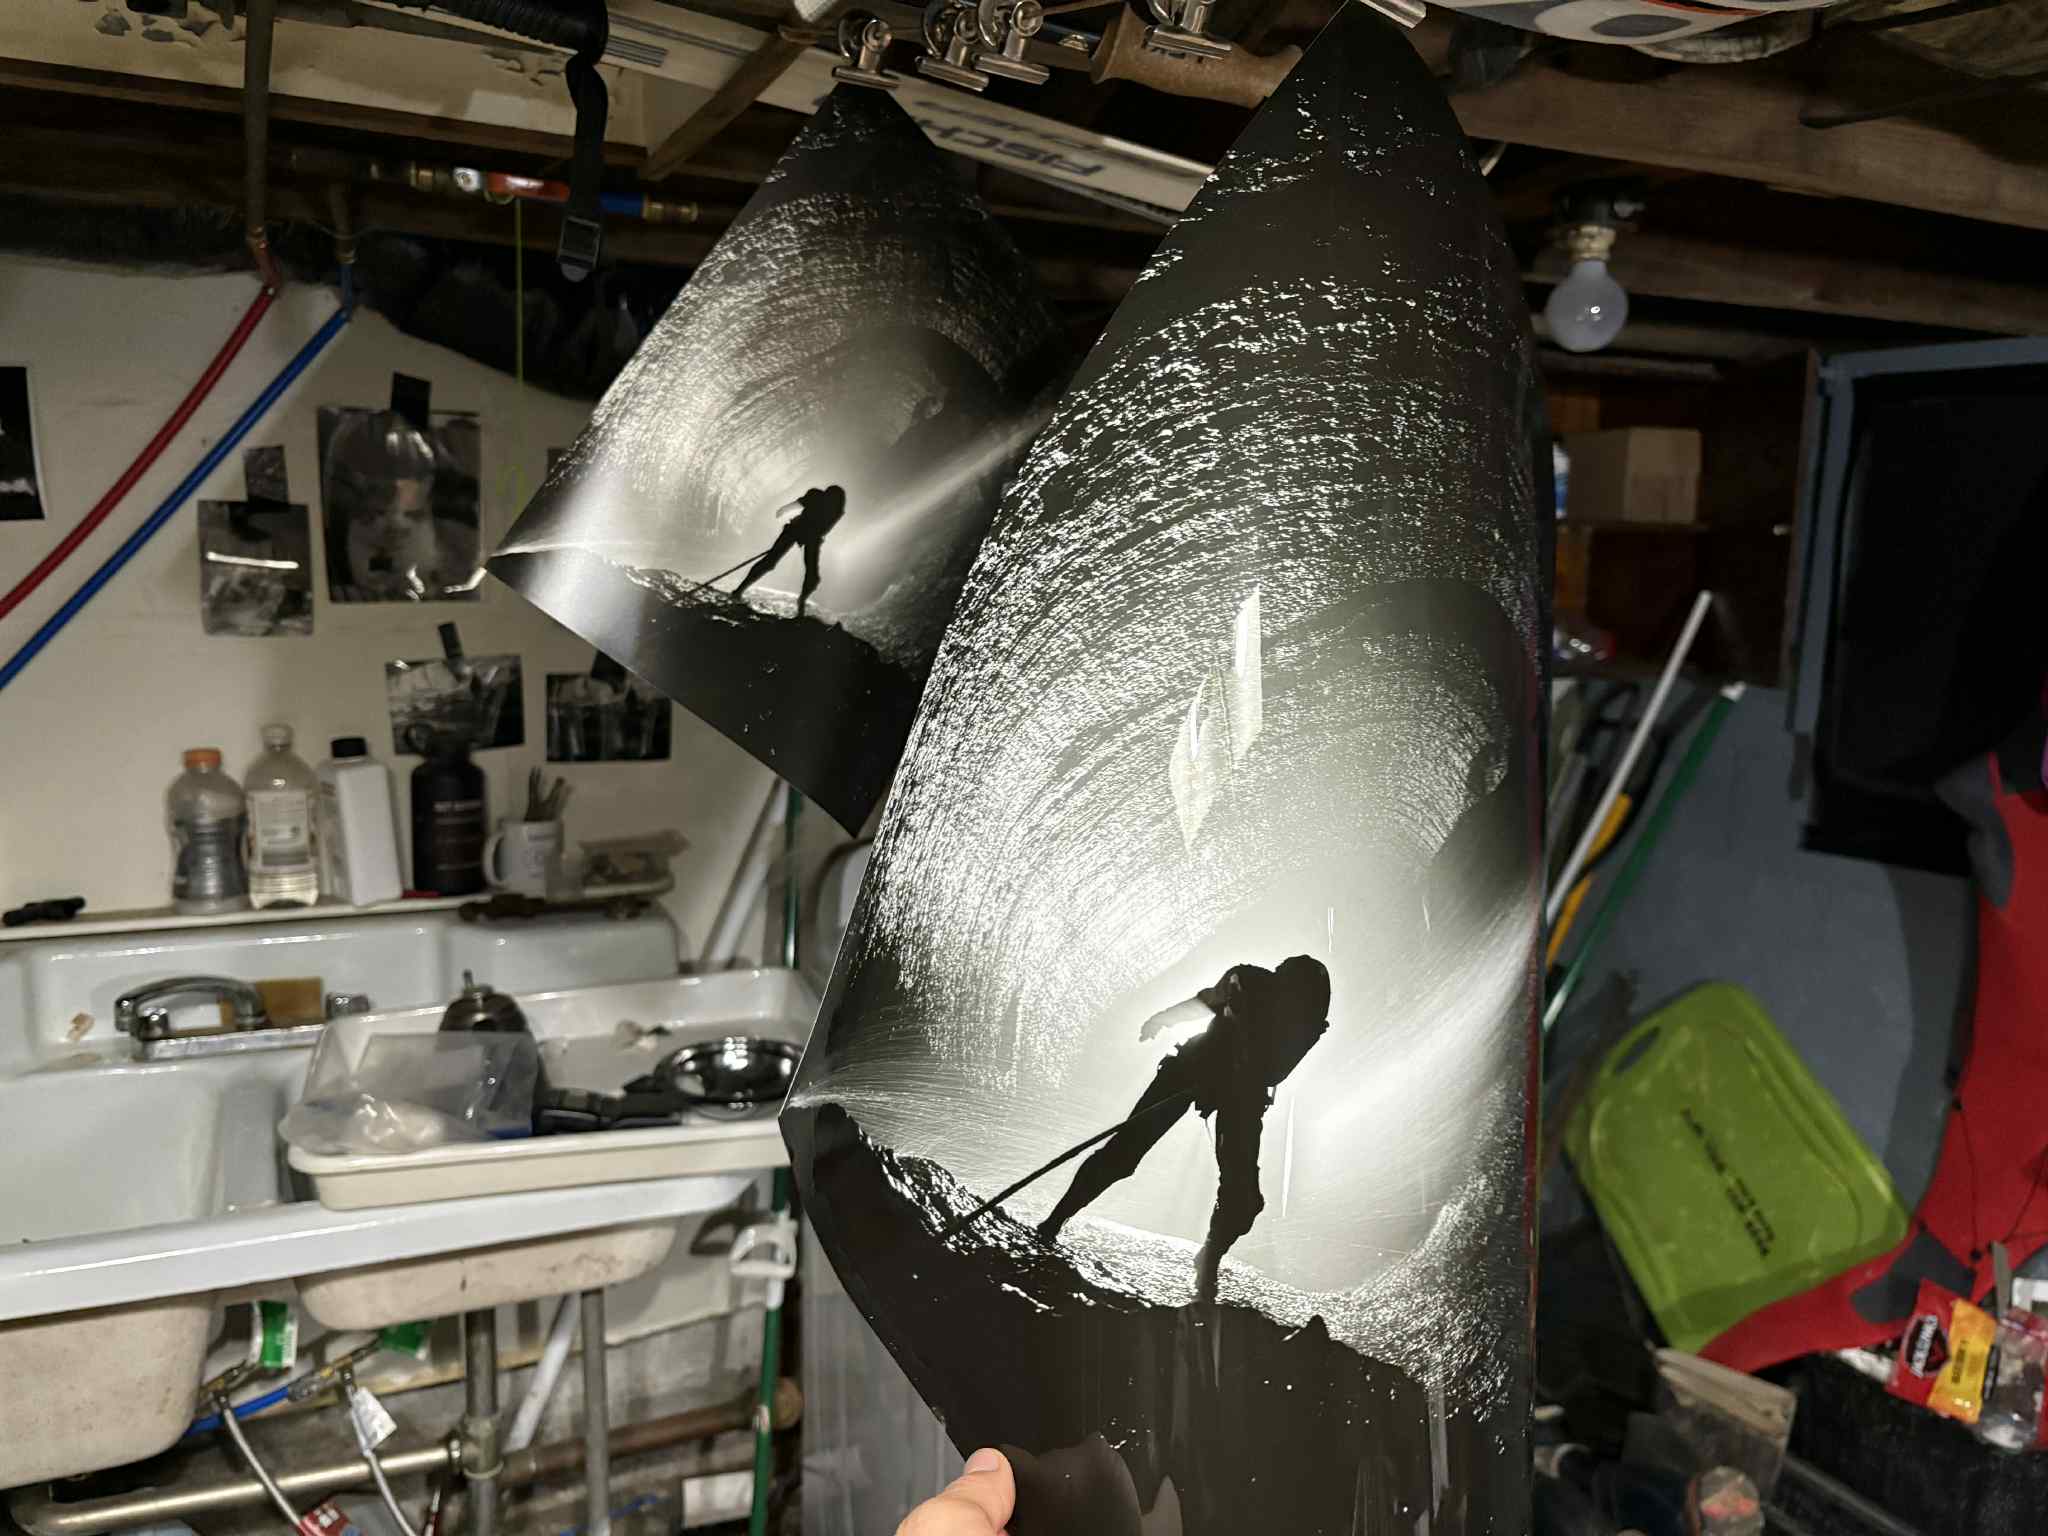
We packed up, and I did a quick bounce down this beautiful pit before heading back to camp. For the next few days, the image haunted my mind. I developed the film Saturday after returning home.
This time I brought a micro-traction, more rope, and a prusik loop. Drew Northup lent me his tripod, which had legs that locked angularly—key to preventing slippage. I let the rope hang straight down the entrance waterfall and secured the tripod using the prusik. The water wicked away cleanly this time, and I was able to jam the tripod into place using the camera’s weight.
It's difficult to fully explain the feeling of being in a situation like this. There are ropes going everywhere: I am tied into one, Hope is on another one. The camera and tripod are all tied into a third one. My pack is clipped onto a set of rebelay bolts next to me. Each time I need to use different gear I have to reach into the pack with a tether, clip it in, and then remove it to use it. If I work with things not clipped into tethers, and I drop them, the impact could very well kill whoever it hits. Everything has to be setup in a very specific and calculated process to keep from getting hopelessly tangled in a web of ropes. All the while there's the sensory aspect: the visuals of constantly looking down the pit, the general lack of a floor below, the pounding roar of the waterfall. It's quite a lot to process at one time. Being this close to the entrance mean that every so often a bug would fly around me to check out my headlamp - just to add to the experience. It's totally insane to look around at the whole setup and realize that you're in control of the whole thing. The only anxiety in my head is dropping the film holders (the only thing I can't tether) down the pit.
It's a moment of pure and genuine adventure in the pursuit of artistic expression, and it's beautiful.
We were supposed to meet Nathan at the entrance around 6 p.m., but it was pushing 8 and no sign of him. Just then, another group showed up above me, also wondering where he was. I was already straddled over the pit, fully set up. We decided to shoot the photo before worrying about the delay.
As it turned out, Nathan’s group emerged at the bottom of the pit just then. With people ready to ascend, I had to move quickly—I was fully blocking their exit.
Hope, seated in her Franklin’s Seat, got into position. Conal prepared several large #22 flashbulbs. The first, used for a digital exposure test, fired perfectly. The next four didn’t fire, and one broke in the socket. Even Nathan couldn’t get them to work.
Then I remembered Conal had brought a flashlight he’d used in the workshop that produced around 16,000 lumens of light. It was so bright that I could see to focus with on the ground glass. A quick digital test exposure metered at f/16 for 1 second.
So I created four exposures. Each time I would have to reset the aperture to wide open and lean out over the pit to check the focus. Then I'd reset the aperture, engage the shutter, and load the fil. I'd have to wait a few seconds for everything to stop vibrating and shaking and I'd fire the shutter while pressing my ear to try to hear the click-hiss-click of the mechanics over the roar of the waterfall. Four expourses: hopefully one of them has the right combination of light and stability.
We packed up, and I did a quick bounce down this beautiful pit before heading back to camp. For the next few days, the image haunted my mind. I developed the film Saturday after returning home.
Printing
Into the film geekery.
Ilford HP5+ is a versatile black-and-white negative film that handles both high and low contrast scenes well. Cave photography, however, is inherently high contrast—often the highest contrast most photographers ever encounter. Shadows are always pure black (minimum density), while highlights will routinely span the full range of the film’s capabilities. In almost all cases there simply is no way to produce enough light to perfectly fill the frame: there are always totally black and blownout white areas. This dynamic range often exceeds what photographic paper can handle in a straight print.
Thus, the classic adage, “Expose for the shadows, develop for the highlights,” doesn’t apply very well here. You can’t expose for the shadows because they are totally black. Instead, you have to decide what parts of the image you’re willing to let go black. Much of the useful negative data lives in the density zones most photographers would dismiss as "too-dark" (Zone 1–3, for those familiar with Adams).
My process is to make contact prints at medium contrast to determine base exposure, then print that across the contrast spectrum—low to high—to see how different zones respond. From there, I map out a multi-filter printing plan.

The Thing From Coeymans Dome’s negative had four main zones of different tones and contrasts. A distinct fog bank had formed part way down the drop where the warm water hit cold cave air, and this area was relatively overexposed - this became Zone A in the print. Around it was a ring of darker zones: the walls, the upper edges of the waterfall, and the foreground which included the rope and some rocks. These zones (B and C) had essentially zero density to them. Furthermore, the light was heavily reflected off the wall at the 9 oclock position and was several stops overexposed (Zone D)
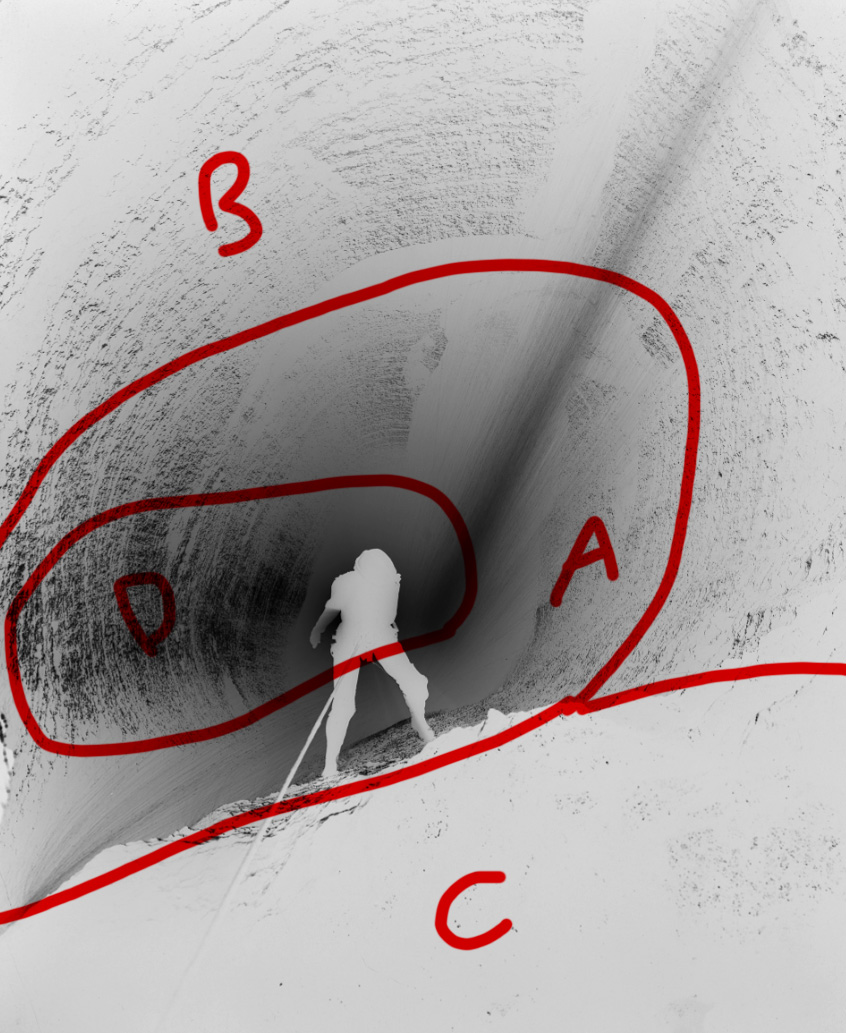
From the contact print series, I selected a high contrast (5.0) ratio for Zones B and C, while keeping Zones A and D at a middle contrast ratio (2.5). This meant that the print first got a full exposure at a contrast level of 5 to print zones B and C – the thin density meant that the exposure was only a few seconds even at f32. Then Zone A got burned in with several extra stops of both contrast 5 and contrast 0. Finally, the extra dense Zone D got another stop burned in at a contrast of 0.
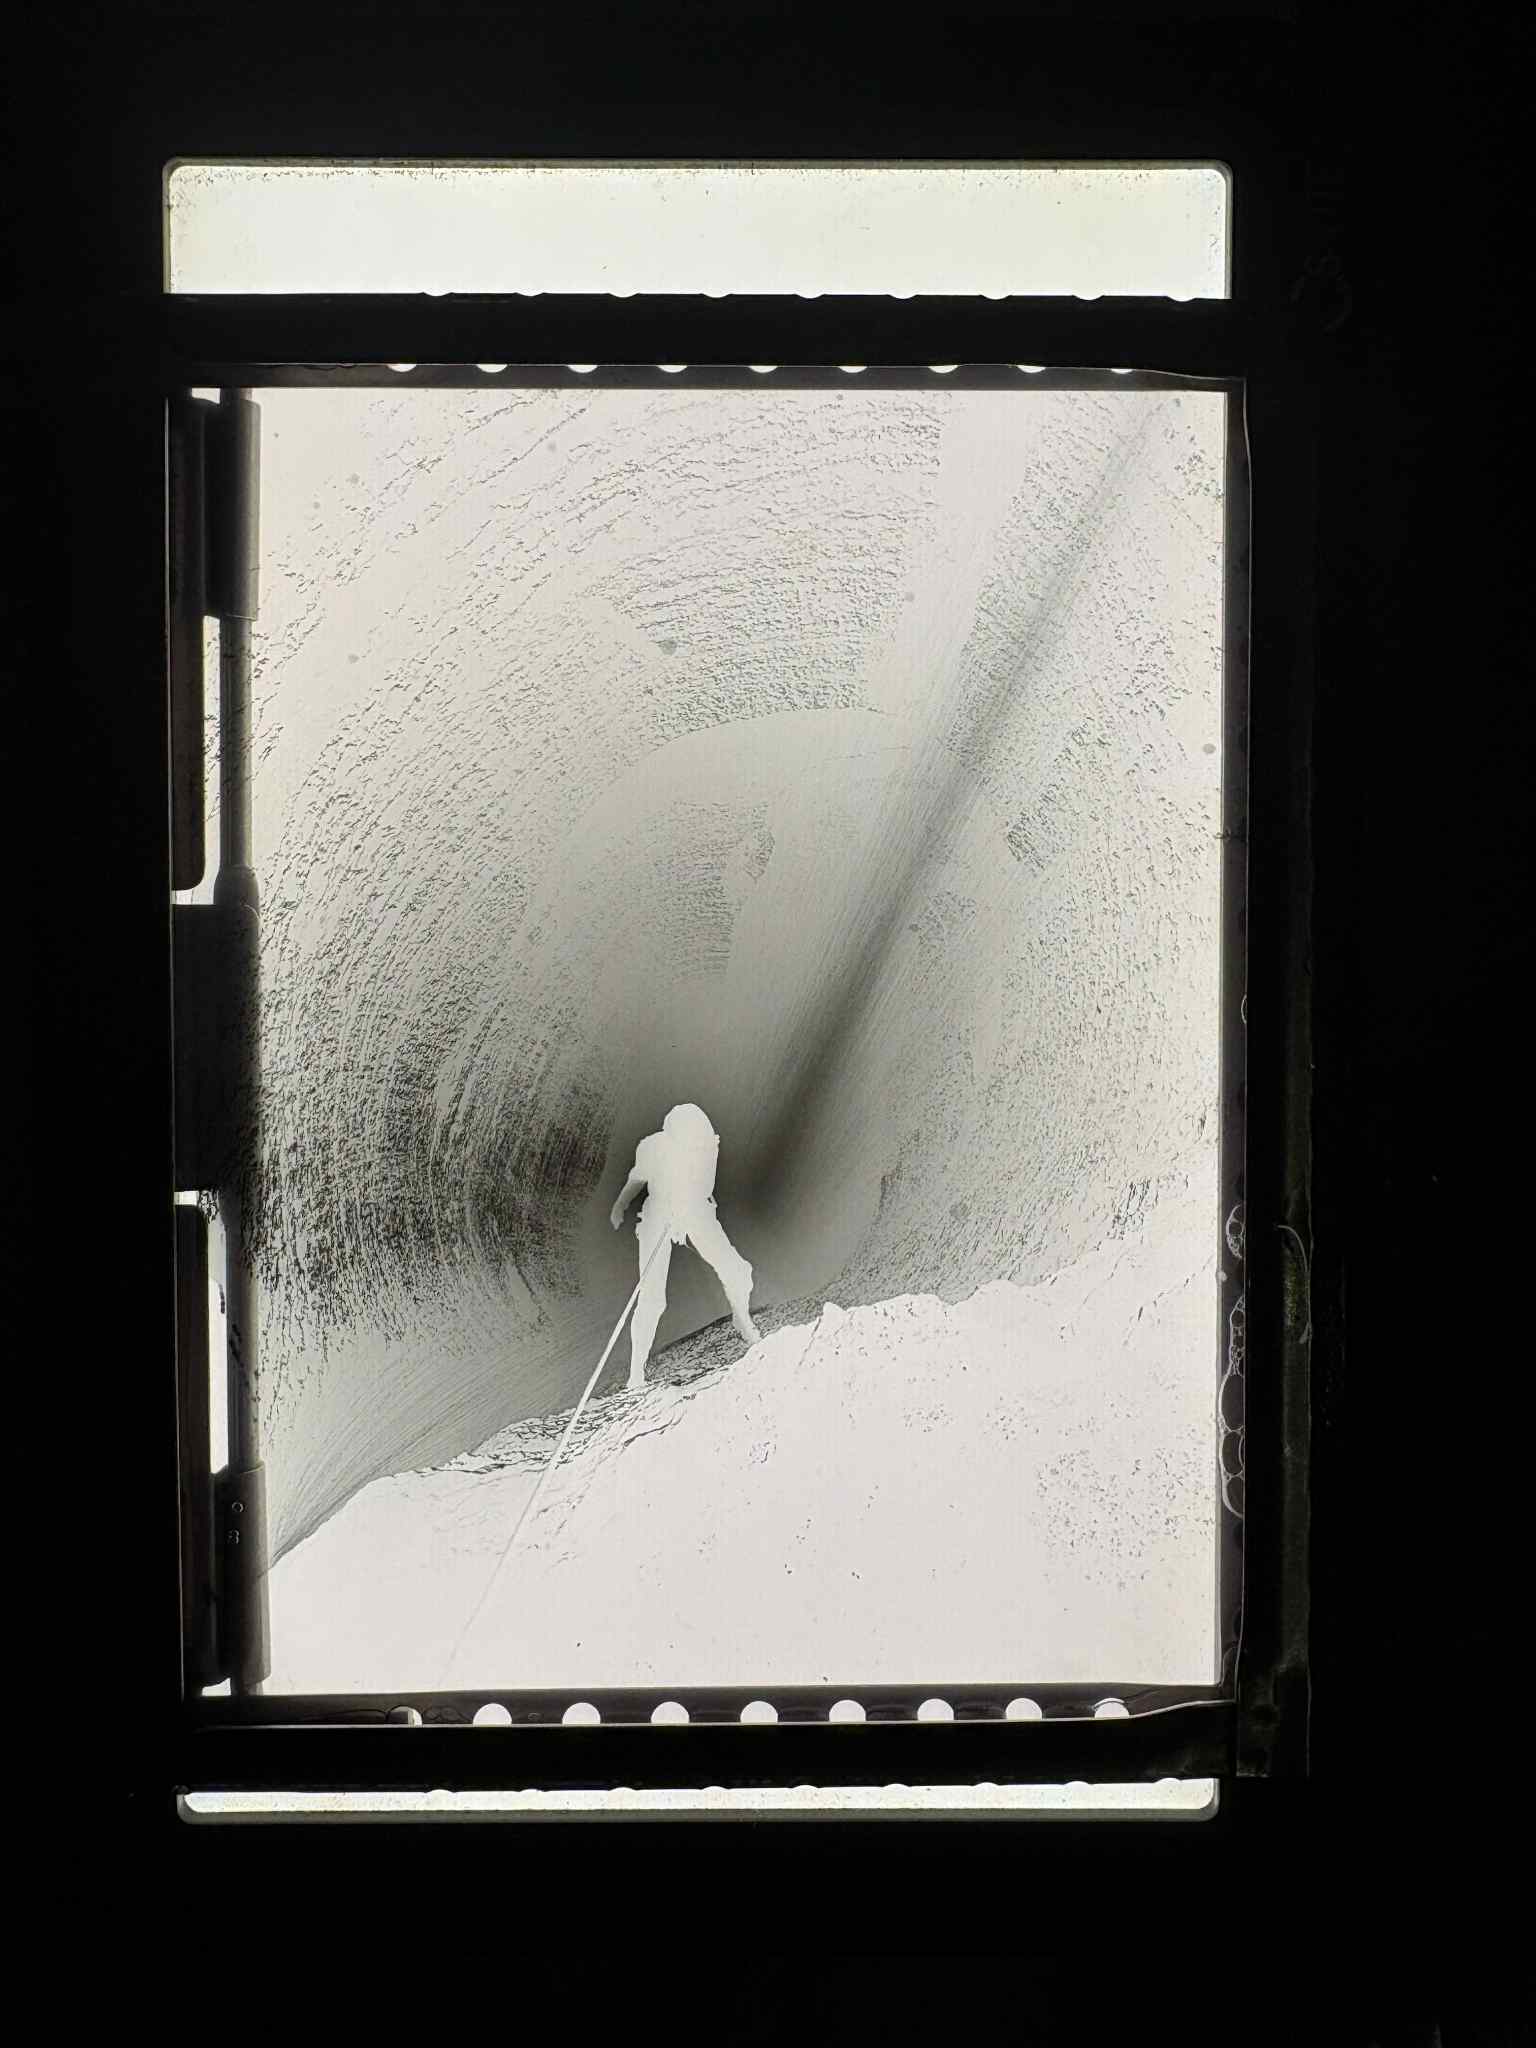
I took these contrast ratios and made the print at 11x14 inches and wrote down the final exposure times on a crude sketch of the image. Can you decipher it? I can, and thats all the matters....?
I took these contrast ratios and made the print at 11x14 inches and wrote down the final exposure times on a crude sketch of the image. Can you decipher it? I can, and thats all the matters....?

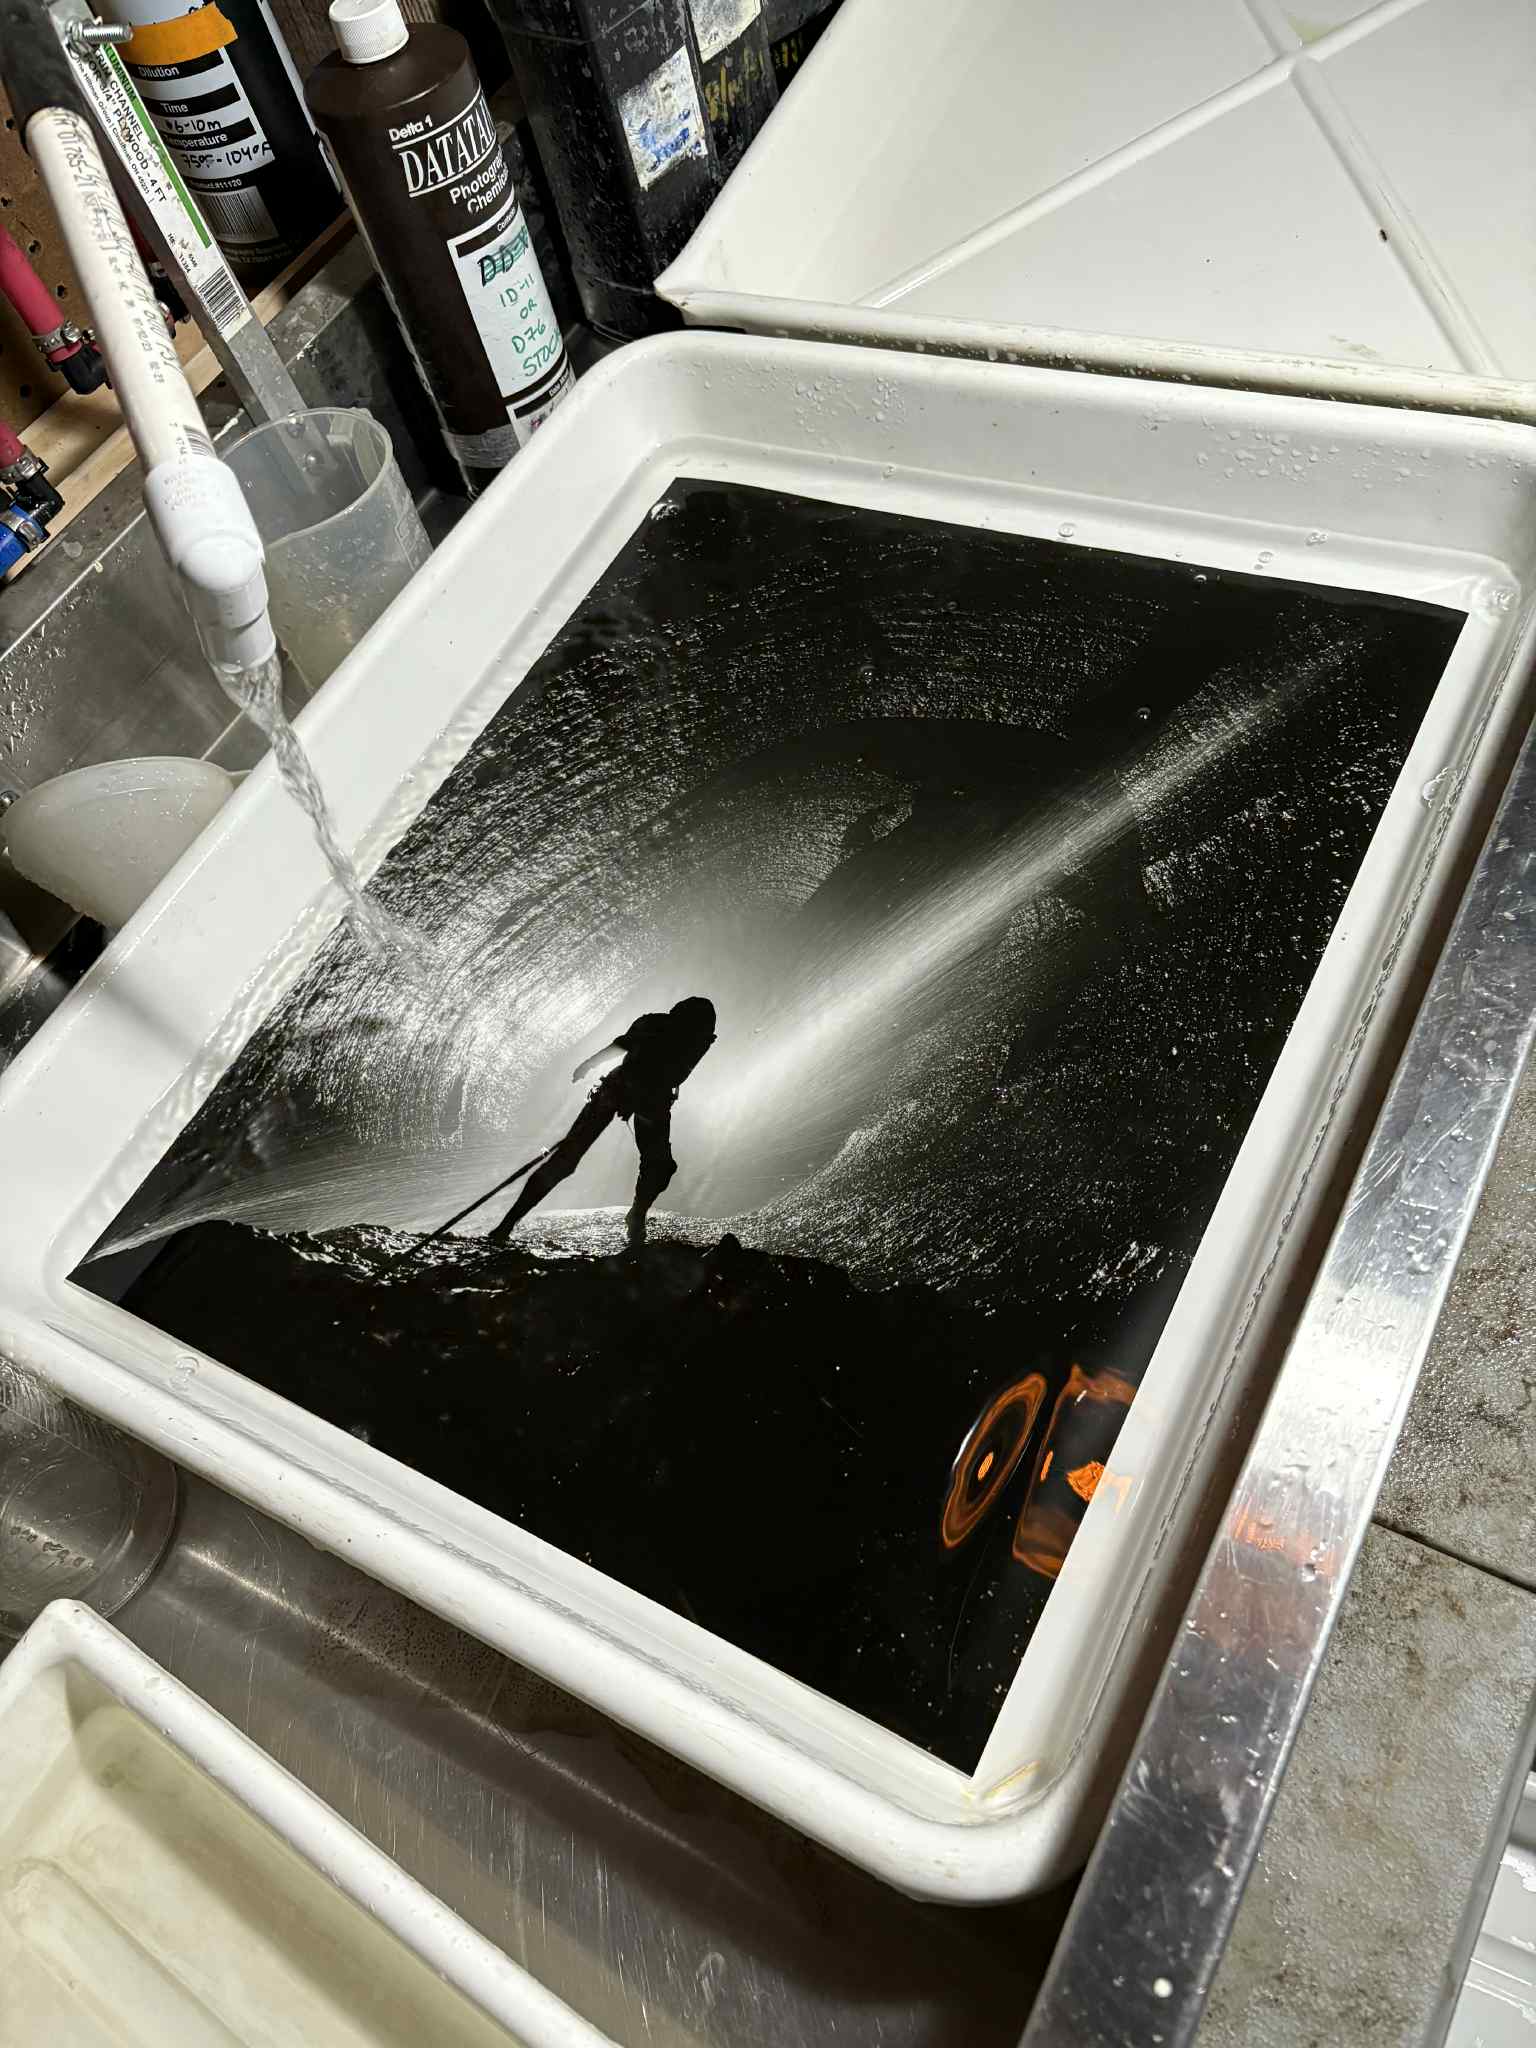
It's a thing of beauty to see such a wonderful photo appear almost like magic in the developing tray. Each print is kind of like re-experiencing the shoot all over again. For several minutes while running through the fixer and rinse baths you get to just sit there with it and take it all in.
Ordering
The previews of the image generated interest quite quickly. Because this image was taken on a National Speleological Society preserve I obtained permission from them to sell prints with the agreement of donating the proceeds to them. More information about this, and the ability to purchase a print and contribute can be found on my online store.
Acknowledgements
This photograph was only made possible bythe contributions of several individuals. Hope Brooks went on both trips to McFails Cave and spent over 7 hours helping for one photograph. Cat Brown, JD Lewis, Nathan Roser, Conal Richards, and Alexa Simmons each went on one fo the trips, both of which lasted 3-5 hours. All of them dealt with heat, humidity, and relentless mosquitos on the surface and several sat for multiple hours at the bottom of a very wet pit. Erik Neiman, preserve manager for the McFails Cave Nature Preserve, was extremely helpful with his rapid approval of permit requests and his rigging of the pit for convention. The Convention staff did a wonderful job of coordinating trips through the week which helped me (mostly) avoid getting in the way of another trip who was just trying to have fun. Pigeon Mountain Industries donated the ropes used for the entire week in McFails Cave. Drew Northup lent his tripod for my second attempt. Finally, a special thanks goes to the National Speleological Society for managing and protecting these amazing underground spaces.